3 Simple DIY Ideas to Make a Toolbox for your home
Be it a leaky pipe to a broken cabinet hatch; you never know when you might run into a home emergency that requires your immediate attention. Hammer, screwdrivers, pliers, nuts, bolts, screws – even if you don’t work with a lot of tools, you’re bound to have at least these necessities with you, somewhere, in some corner of your home. While it is essential to have
tools around the house, what’s even more important is to keep them well-organized so you can reach them easily whenever needed. This saves you the frustration of scrambling for tools during a crisis because you know exactly where to look to find what you need. A toolbox thus becomes a good investment.
While there are many options available in the market, before you jump the gun and get yourself one, wait! What if we tell you that you don’t have to shell out on a brand-new toolbox? Yes, it’s possible – and all it takes is your imagination, creativity and a little bit of elbow grease to build your very own toolbox.
Here we will lay out some crafty DIY plans that you can use to create your own toolbox:
Table of Contents
Toolbox from Beer Box
Do you have those heavy beer boxes you usually trash? If yes, pull up one because we’ll show you how beer boxes can be used as storage boxes for storing many items. Rather than discarding the box that’s no longer used for storing beer, you can easily transform it into a toolbox. Beer boxes have a standard design, and since they are meant to carry heavy weight, they can hold all types of tools very easily.
What you’ll need?
– Beer box
– Aluminum sheets or scrap metal
– Plywood
– Hand saw
– Measuring tape
– Marker Pen
– Polyurethane glue
– Drill
– Some bolts & hinges to assemble it as per your needs.
Instructions:
Step 1 – Prepare the box: This is the easiest step. You simply need to empty the box and remove the whole interior. Any beer box will do the job as long as it is of a standard design. Use a hand saw and measuring tape to size and cut plywood into the appropriate dimensions. Glue some plywood to the inside of the box on all sides using polyurethane glue.
Step 2 – Prepare the Cover: You can use the bottom of another beer box to create the cover. Top it off with an aluminum sheet to make it sturdier.
Step 3 – Prepare the Handle: You can use scrap metal to create this. Simply glue some aluminum pieces together and a steel tube. Cut them to the right size, and drill holes in the sides of the handle and on the box.
Step 4: Assemble: Fix the cover with hinges to the box and use bolts to fix the handles to the side of the box. You can also paint it your desired color.
And voila! Your toolbox is ready!
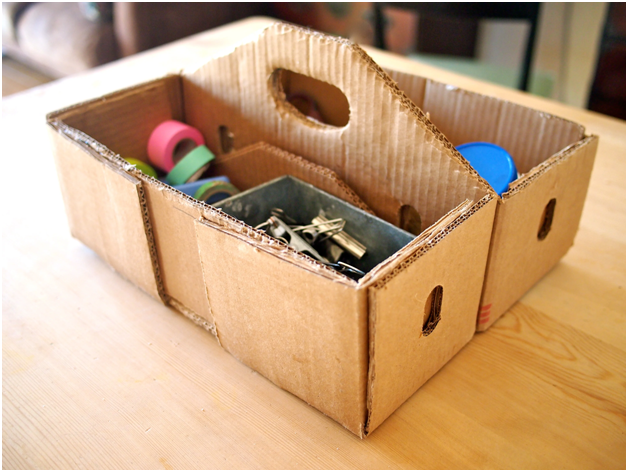
Cardboard Toolbox
Not the sturdiest option around, but you can consider making a cardboard toolbox. It may not give you a lot of room for customization, unlike other tool storage boxes DIY plans out there, and it can be a fun little project. This also helps in recycling and reusing boxes that you would otherwise discard.
Its beauty lies in its simplicity; because just about anyone can make this. In fact, you don’t need a lot of tools to get started. However, be warned that you will only store small and light items in such a box due to the material used.
What you’ll need?
– Old cardboard boxes
– Duct tape
– A sharp knife
– Ruler
– Measuring tape
– Pen
– Glue
– Scissors
Instructions:
Step 1: Cut all the pieces: This is the basic step. Use the ruler, pen, and measuring tape to mark the right sizes. Cut out the bottom, sides, and compartment separators to create barriers within the toolbox. Get creative here, and create compartments as per your requirement.
Step 2: Holders: You need to cut out a holder in the right size so that it is easy to pick up the box.
Step 3: Assembly: As mentioned in the beginning, it is an easy-to-make toolbox requiring very few steps. Once you have cut out all the parts, the next step is to put the sides, holder, and barriers in place. Use a hot glue to put everything in place. You can cover the edges with duct tape to avoid wear and tear from tools while picking them.
Pro tip: For a sturdier option, replace cardboard with plywood or wooden sheets, and use nails to fasten the sides. Add fortification to the structures by bolting hinges in place.
Paint bucket toolbox organizer
This is the most basic toolbox you can create and does not require much, except for sewing skills. More than considering this as one of the storage boxes that you can use for storing tools, you can categorize this as an easy-to-access organizer that you can carry around with you wherever you go. One of the best ways to do this is to repurpose an old paint bucket or any metal bucket and sew a fabric organizer to hold your tools in place.
What you’ll need?
-Paint bucket or any old metal bucket
-Thick canvas cloth
-Sewing needles & thread or a sewing machine
-Scissors
-Measuring tape
Instructions:
You will only need some basic sewing skills and your imagination to create an organizer that can sit on the edges of the bucket and give you easy access to all your tools, big or small. Ensure you provide access to the bucket’s handle by adding slits to the cloth. Add as many pockets as you can depending on your need, such that there are pockets both on the inside of the bucket and outside once the cloth cover is fitted into the bucket.
So, what did you think of these DIY ideas? You can also opt for a readily available toolbox. If you are looking for storage boxes in Dubai, plastic storage boxes, tool storage organizers, or toolboxes, you can find many options at Homesmiths and other online shopping portals.


No Comment